Sunday, October 29, 2006

Potato, quinoa, and cumin hash browns


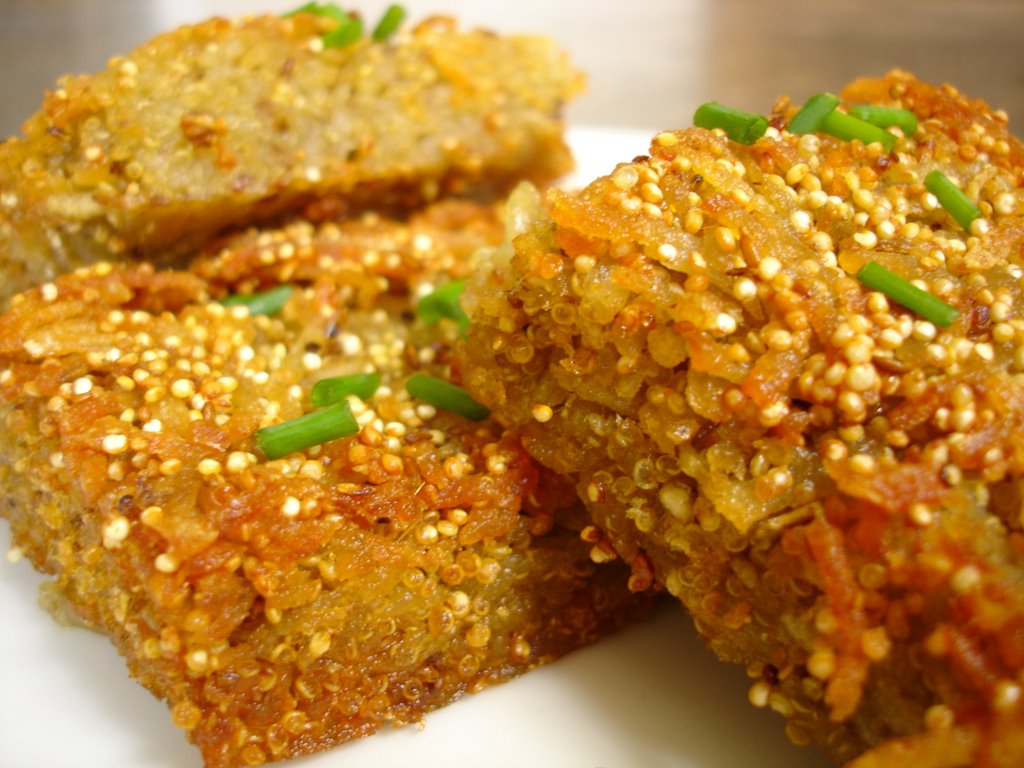
I decided to check out the new Chow foodie site. It was recently bought by CNET it is chock full of great content: I wish I created it myself! It has some terrific recipes in addition to cookbook and product reviews and instructional videos / content. My eye fell on a recipe for potato, quinoa and cumin hash browns which looked interesting and unusual. I happened to catch it just before a planned brunch for this weekend -- what a great time to try it out! I did everything up until the frying the day before and then just took the potatoes out of the refrigerator and cut and fried them morning of. This made what is a somewhat lengthy process (due to the 3 hours required to chill the potatoes before frying) more manageable. The hash browns turned out scrumptious and the toasted cumin added just the right twist to the old classic. I found the fact that they pre-baked and chilled the potatoes interesting – I assume that was to get them to hold a nice, compact, square shape, which they did.

Total Time: 1 hr 20 mins, plus chilling time (~3 hours additional)
Active Time: 50 mins
Makes: 12 hash browns

1 cup quinoa
3 tablespoons cumin, toasted
4 teaspoons kosher salt
2 1/2 pounds peeled Idaho potatoes
1 bunch chives, chopped

Heat oven to 400°F. Using a spice grinder or a mortar and pestle, coarsely grind together the quinoa, cumin, and salt; set aside.

Using a food processor with the grating attachment, grate the potatoes. Remove the grated potatoes from the processor and place them in a mixing bowl. (Alternatively, you can use a box grater.)

Let the grated potatoes rest for 5 minutes. Squeeze the liquid from the potatoes, one handful at a time, and place them in a separate, clean mixing bowl.

Add the ground quinoa, cumin, and salt mixture to the squeezed potatoes, and mix with your hands until well incorporated. Oil a 9-by-13-inch baking dish with olive oil and place a piece of parchment paper on the bottom, cut to fit exactly.

Pour the potato mixture into the oiled pan and pack it down (make sure to keep it a consistent thickness). Brush the top of the mixture with some more olive oil, and cover with another piece of parchment paper placed directly on the potatoes.

Place in the preheated oven and bake for 25 minutes. Remove from the oven and allow to cool to room temperature. Place in the refrigerator to cool completely, about 3 hours.

After 3 hours, remove from the refrigerator and slide a thin, sharp knife around the perimeter of the potatoes to loosen them from the pan. Flip the potatoes onto a cutting board. Trim off any crisp edges and cut into 12 equal pieces.

Fill a frying pan with 1/2 inch of a neutral oil (such as vegetable, canola, or peanut) and heat over medium heat. When the oil is hot (about 350°F), fry the hash browns until crisp and golden brown, about 3 to 5 minutes per side. Drain the finished hash browns on paper towels, season with salt, garnish with chopped chives, and serve.

Monday, October 23, 2006

(Vegetarian) chili

Fall's officially here. Time to transition to some warm, hearty comfort food. I finally gave in to my nagging desire to buy Jack Bishop's A Year in A Vegetarian Kitchen (see sidebar for Amazon link). It arrived on Saturday and I spent the morning flipping through it and drooling over what looks like some very nice recipes. It's organized by season which is always helpful in coordinating with fresh ingredient availability and state of mind. What caught my eye on this cold weekend was the hearty red been chili with ancho chiles and coffee. Coffee? Sounded interesting. His foreword touts the quick / easy nature of his recipes (he claims he cooks most nights and has dinner on the table in an hour or less -- including cleaning the kitchen first). I must have chosen the one recipe that takes closer to 4 hours to make. I guess if you count the number of days you can eat the leftovers you'd get to an hour average! Apart from the time, it was easy Рand it turned out to be delicious. It had a pleasant spiciness due to the chiles and was rich and creamy due to the beans. I added a pound of white meat ground turkey, to make it extra hearty, which I saut̩ed with a little salt and pepper and a pinch of cumin (so much for vegetarian!). He suggests serving with either rice or corn bread (there's a very nice corn bread recipe in the book which I plan to try too).

Red Bean Chili with Ancho Chiles and Coffee

2 1/2 quarts water
1 pound dried dark red kidney beans, rinsed and picked over to remove any stones
2 bay leaves
Salt
4 dried ancho, quajillo, and / or pasilla chiles
1 1/2 cups boiling water
3 tablespoons canola oil
2 medium onions, finely chopped
6 medium garlic cloves, minced
1 tablespoon ground cumin
1/2 cup brewed coffee
1 14.5 oz can diced tomatoes
1/4 cup chopped fresh cilantro leaves
Hot sauce, such as Tabasco (optional)

Place the water, beans, and bay leaves in a large saucepan. Bring to a boil, reduce the heat, and simmer for 30 minutes. Add 1 teaspoon salt and continue to simmer until the beans are beginning to soften slightly but are not yet completely tender, about 45 minutes. Discard the bay leaves, cover the saucepan, and set the beans aside in the cooking liquid.

Snap off the stems of the chiles and discard. Shake out as many seeds as possible and discard. Place the chiles in a medium bowl and cover them with the boiling water. Soak until the chiles are soft about 15 minutes. Lift the chiles from the water and transfer them to a blender, reserving with water. Pour the water through a strainer into a measuring cup to catch the remaining seeds. Discard the seeds. Puree the chiles, adding as much of the chile soaking liquid as necessary to make a thick but smooth puree (You will probably need about ¼ cup soaking liquid; reserve the rest). This step can be done as you are cooking the beans to save time.

Heat oil in a Dutch oven over medium heat until shimmering. Add the onions and ½ teaspoon salt and cook, stirring often, until golden and soft, 8 to 10 minutes. Stir in the garlic and cumin and cook until aromatic, about 2 minutes. Scrape the chile puree from the blender jar into the pot and cook until very fragrant, about 3 minutes.

Add the remaining chile soaking liquid, coffee, tomatoes, and beans and their cooking liquid to the Dutch oven. Bring to a boil, reduce the heat, and simmer, stirring occasionally, until the beans are tender and the chili is thick, 1 to 1 ½ hours. (The time will very depending on the freshness of the beans and how quickly the liquid cooks off. You can’t really overcook chili. If your beans aren’t as creamy as you would like but the pot is getting dry, just add some water and keep cooking.) Stir in the cilantro and add salt to taste and hot sauce if using. Serve or refrigerate in an airtight container for several days.

Variation: Add 1 lb lean ground turkey (browned with salt and pepper and a pinch of cumin and add to the chili ~30 minutes before finished)

Tuesday, October 10, 2006

All about eggs

I’ve been rediscovering eggs lately. They are such a perfect source of quick, inexpensive protein. I’ve become a bit of an organic / farm fresh zealot. The fresh eggs available at the farmer’s market taste so much better than the store bought variety that it’s worth waiting to stock up. This all got me thinking about eggs – what makes eggs different colors? How can you tell a fresh egg from an old-ish egg? What is that slimy membrane-y thing you see in eggs? What’s that red dot you sometimes find? I thought I’d compile all my learnings in a post. I’ve used four main sources for this: Wikipedia, The American Egg Board, Martha Stewart (from which most of the anatomy and the preparation / cooking information is drawn) and Delicious Organics (an online retailer of organic produce). In most cases I’ve taken the information from these sources verbatim, meshing together some facts from different sites and adding a few of my own. I found all of the information across sources to be consistent. If you have any additional thoughts you’d like to add or any corrections to point out, please do post a comment!


Freshness

  • Egg cartons from USDA-inspected plants must display a Julian date--the date the eggs were packed (this date starts with January 1 as number 1 and ends with December 31 as 365). Although not required, they may also carry an expiration date beyond which the eggs should not be sold. In USDA-inspected plants, this date cannot exceed 30 days after the pack date. It may be less through choice of the packer or quantity purchaser such as your local supermarket chain. Plants not under USDA inspection are governed by laws of their states.
  • As an egg ages, the porous shell will allow more and more air to enter into the egg. A fresh egg will sink to the bottom of a glass of water: an older egg will become increasingly buoyant.
  • The freshest eggs you can find are the best for frying and poaching, as they are the firmest and will hold their shape well. Eggs that are ten days old and older are actually better for certain purposes, such as whipping and beating for recipes, and for hard-boiling, since a slightly older egg is easier to peel once it is cooked.

(photo above from The University of Nebraska Cooperative Extension)

Anatomy

  • Yolk: The yolk makes up approximately one third of the weight of an egg and contains all of the fat and just under half the protein. It is extremely vitamin-rich, containing every vitamin except C; it’s also one of the few natural food sources of vitamin D. The yolk also contains more phosphorus, manganese, iron, iodine, copper, and calcium than the white, and it contains all of the zinc. The yolk of a Large egg contains about 59 calories. The yolk acts as an emulsifier in recipes, allowing combinations of ingredients—such as oil and water—that normally don’t mix. A fresh yolk will be firm and will stand tall when the egg is broken. The color of the yolk is largely determined by what the hen is fed.
  • Albumen (egg white): The albumen makes up the remaining two-thirds of an egg’s liquid weight, and is itself approximately 87 percent water. It contains more than half of the protein of the egg, is fat-free, and is rich is niacin, riboflavin, chlorine, magnesium, potassium, sodium, and sulfur. The albumen directly surrounding the yolk is called the “thick white,” and is firmer and thicker than the outer layer. This is especially true in a very fresh egg; as an egg ages, the entire white thins and becomes more watery. A cloudy egg white often seen in very fresh eggs is caused by the harmless presence of carbon dioxide, which escapes as the egg ages.
  • Chalaza: These small, white, stringy pieces act as an anchor between the yolk and the thick white, and are most apparent in fresh eggs. They are harmless and needn’t be removed (they are neither imperfections nor beginning embryos, contrary to popular belief), though they can be strained away for aesthetic purposes if desired. The more prominent the chalazae, the fresher the egg. Chalazae do not interfere with the cooking or beating of the white and need not be removed, although some cooks like to strain them from stirred custard.
  • Air cell: A pocket of air that forms between the wide end of the eggshell and the albumen and increases in size as an egg ages. A very fresh egg will have little or no air cell.

Grading of Eggs

  • The United States Department of Agriculture (USDA) has established a grading system for eggs sold in the shell. It is not mandatory that eggs be graded by this system to be sold, but only those that meet the standards will carry the USDA grade shield on the package. In order of quality, USDA grades are AA, A, and B. Grades are not determined by size or nutritional value, but rather by age, shape and appearance of the shell, yolk, and albumen, and size and location of the air cell.
  • An egg graded AA will have a firm yolk and a thick albumen, a small air cell, and will generally not be more than 10 days old. Grade A eggs can be ten days to several weeks old, and will have a fairly firm, upstanding yolk and a good proportion of thick white to thin. Both AA and A must have oval-shaped shells with one larger end; a misshapen egg will automatically be grade B. A grade B egg is more watery than the higher grades, and will have a larger air cell. B eggs are rarely sold in grocery stores and generally go straight to manufacturers of egg products.

Blood Spots

  • Blood spots are occasionally found on an egg yolk. Contrary to popular opinion, these tiny spots do not indicate a fertilized egg. Rather, they are caused by the rupture of a blood vessel on the yolk surface during formation of the egg or by a similar accident in the wall of the oviduct. Less than 1% of all eggs produced have blood spots.
  • Mass candling methods reveal most eggs with blood spots and those eggs are removed but, even with electronic spotters, it is impossible to catch all of them. As an egg ages, the yolk takes up water from the albumen to dilute the blood spot so, in actuality, a blood spot indicates that the egg is fresh. Both chemically and nutritionally, these eggs are fit to eat. The spot can be removed with the tip of a knife, if you wish.
  • Eggs with blood spots are not kosher. This is because blood spots can also occur due to fertilization. Of course, most hens nowadays are not allowed anywhere near a rooster so fertilization is an impossibility in today's eggs, but religion dictates that we toss the egg with the blood spot. The laws of Kashrut do not dictate white eggs over brown or other color eggs, just that it not be a fertilized egg. Some people believe that there are more blood spots in brown eggs than white eggs because they mistakenly think that a naturally occurring brown coloration in the brown egg is a blood spot and it is not. The laws of Kashrut are clear that it is the red blood spot that is not allowed for fear of fertilization and that brown spots can be ignored.

Appearance

  • If a boiled egg is overcooked, a greenish ring sometimes appears around egg yolk. This is a manifestation of the iron and sulfur compounds in the egg. It can also occur when there is an abundance of iron in the cooking water. The green ring does not affect the egg's taste; overcooking, however, harms the quality of the protein.
  • Egg shell color is caused by pigment deposition during egg formation in the oviduct and can vary according to breed, from the more common white or brown to pink or speckled blue-green. Aracona chickens, for example, lay a lovely green shaded egg. Breeds with white feathers and ear lobes lay white eggs; breeds with red feathers and ear lobes lay brown eggs. White eggs are most in demand among American buyers. In some parts of the country, however, particularly in New England, brown shells are preferred. The Rhode Island Red, New Hampshire and Plymouth Rock are breeds that lay brown eggs. Since brown-egg layers are slightly larger birds and require more food, brown eggs are usually more expensive than white. Egg color is simply an aesthetic preference.
  • Yolk color is dependent on the diet of the hen; if the diet contains yellow/orange plant pigments known as xanthophylls, then they are deposited in the yolk, coloring it. A colorless diet can produce an almost colorless yolk. Farmers may enhance yolk color with artificial pigments, but in most locations, this activity is forbidden
  • Size is actually determined by the age of a hen. The older the hen, the larger the egg.
  • Double yolks come from the same hens making the XL eggs. A large egg should weigh no less than two ounces, whereas a jumbo will weigh about two and three-quarter ounces, and a small about one and one-half ounces.

Preparing and cooking

  • Separating eggs: Even a drop of fat will decrease volume, so be careful not to let any yolk fall into the bowl. Eggs are easiest to separate when they are cold, but bring the separated egg whites to room temperature before beating them.
  • Whipping egg whites: Use a stainless-steel and copper bowls to yield the best results. Avoid plastic, which can retain traces of fat even when washed.
  • Boiling eggs: Despite the name, boiled eggs should not be boiled throughout the cooking process—a method that yields a rubbery result—but instead should be brought to a boil and then removed from the heat.

Instructions for the Perfect boiled egg:

  • Place eggs in a single layer in a saucepan, and cover with 1 inch of cold water. Bring to a boil, cover, and immediately remove from heat. Let stand approximately 1 1/2 to 2 minutes for soft-boiled, 2 to 2 1/2 minutes for medium-boiled, and 12 to 13 minutes for hard-boiled. Remove eggs from water.
  • Soft- and medium-boiled eggs should be served immediately in egg cups—perfect for cracking and scooping the egg right from the shell.
  • Hard-boiled eggs should be removed from the pot and plunged into a bowl of ice water. This prevents the yolk from discoloring due to overcooking and facilitates peeling. Let stand for 2 minutes, then crack by gently pressing the egg against a hard surface. Peel under cold running water. Serve.

Storing

  • For best results, store eggs in the container they are sold in, on a refrigerator shelf rather than in an egg compartment on the door, which is subject to frequent temperature changes as the door opens and closes.
  • Inappropriate temperature and humidity will age an egg. (A week-old egg can actually be fresher than a day-old egg.) In the U.S. eggs are refrigerated but in other parts of the world they are not. They will keep fresh out of the refrigerator if never placed in cold. Once they are refrigerated, they must always be refrigerated to maintain freshness.
  • Refrigerate unbeaten whites, tightly covered for up to four days, or freeze (in ice-cube trays, then transfer to a freezer bag), up to six months (thaw overnight in the refrigerator).

Other

  • Recently, chicken eggs that are especially high in Omega 3 fatty acids have come on the market. These eggs are made by feeding laying hens a diet containing polyunsaturated fats and kelp meal.
  • If a raw egg is spun, abruptly stopped and then quickly released, it will start to spin again as the liquid inside continues to rotate. This technique can be used to reliably determine whether an egg is raw or already boiled — a solid egg will remain stationary once halted. Additionally, if a cooked egg and a raw egg are spun with the same force, the cooked egg will spin much faster. Another way of determining if an egg is raw or already boiled is to spin it quickly. An already boiled egg will spin into an upright position after a few seconds, but the raw egg will continue to spin on its wide side.

    Wednesday, October 04, 2006

    Apricot jam


    Ok. I’m back. Time to resume non-canine activities. I was thinking about which recipe to post this week and thought I’d post one that you can enjoy for a long time . . . jam!

    I took a canning class at the Culinary Institute recently. The average age of the class was rather high – I guess canning is an old fashioned and somewhat quaint pursuit. I have always been interested in canning – more for the endless gift-giving opportunities it affords than for preserving out-of-season items, but have not tried it for fear of poisoning my gift recipients. It seems improper canning could easily result in botulism and lead to certain death – oh my! So I took a class to learn proper methods and handling and am now cautiously optimistic about my ability to impart joy without harm.

    I always thought canning required a lot of equipment and space, but actually you need relatively few items – at the most basic level, proper canning jars and lids and a pot large enough to fill with enough water to cover the jars by several inches. We concentrated on canning high-acid foods (pH value 4.6 or lower) which require heat processing to 212 degrees Fahrenheit and can therefore be processed using a simple boiling water canner for a specified period of time. Low acid foods must be processed at temperatures of 240 degrees Fahrenheit to destroy harmful bacteria and follow an entirely different process which is more involved and was not covered in our class. High-acid foods include fruits, jams, jellies, pickles, relishes, chutneys, vinegars, etc.

    Canning requires precisely following a strict set of directions that cannot be altered by the novice. This means adhering to the exact sugar content and jar size specified in the recipe as both are exactly related to the processing time specified.

    I recently read a great blog post on the process on Andrea’s Recipe Box which I will reference so as not to repeat the same information available there.

    My favorite recipe was for Apricot Jam which is my all-time favorite jam. I’m excited to buy Ball’s Blue Book of Canning (see my sidebar for an Amazon link) to explore more great recipes and ideas. Even if you don’t want to venture into canning, you can obviously make the jam and refrigerate it for a few weeks. If you decide to can, your jam will keep for a year in a dark, cool place.

    Apricot Jam
    (Makes about 4 pints)

    2 quarts pitted and crushed apricots (no need to chop – large pieces will reduce to a nice size and provide great texture)
    2 cups dried apricots, roughly chopped
    ¼ cup lemon juice
    2 cups granulated sugar

    Combine fresh apricots, dried apricots and lemon juice in a large pot over medium heat. Gradually stir in sugar and increase heat to high, stirring frequently until thick. Ladle hot apricot jam into hot jars, leaving ¼ inch headspace. Remove air bubbles, adjust lids and process 15 minutes in boiling water canner.