Monday, January 28, 2008

Daring Bakers Challenge: lemon meringue pie

Last time, I swore I would not leave this month’s Daring Baker’s challenge to the last minute. But, here I am on posting day finishing up my lemon meringue pie! Argh! There’s always next month!

This month’s challenge is hosted by Jen at The Canadian Baker. It’s a classic lemon meringue pie from Wanda’s Pie in the Sky by Wanda Beaver, 2002. In the interest of full disclosure, I am neither a fan of lemon curd nor a fan of meringue so this was not a challenge of the heart but rather a challenge of the head. For me, the interesting part of this recipe was the meringue. The dough was classic and straightforward to make, the curd was a cinch and cooled to a wonderful, firm consistency. But the meringue! I’ve made meringue before so it was not the meringue itself that was a challenge but rather preventing it from shrinking after baking or sweating/weeping and becoming a messy puddle on top of the lemon curd. I didn’t realize this would be so tricky until I read about the experiences other Daring Bakers were having with the recipe on the group’s private blog.

I did a little research on this issue and it appears to be a common lemon meringue pie challenge. There are several ways to address it. Read here for a comprehensive explanation.

1. Make sure sugar is fully dissolved in the meringue (sugar attracts moisture): use superfine sugar which is more easily dissolved and test to make sure its dissolved by feeling meringue between your fingers before you stop whipping
2. Add a cornstarch and water mixture to the meringue after the sugar is incorporated to help stabilize the meringues (see link for specifics)
3. Always pile meringue onto piping hot, not cooled, curd/cream so that bottom layer of the meringue is sufficiently cooked by the residual heat from the filling
4. Be careful not to over bake or under bake the meringue (when egg whites are baked too long they begin to tighten and squeeze out moisture)
5. Make sure the meringue is layered all the way over the edge of the pie so that it forms a tight seal: putting the meringue on the pie from the outside in helps in this regard
6. Allow the pie to cool gradually after baking: leave pie to cool in the oven, door open

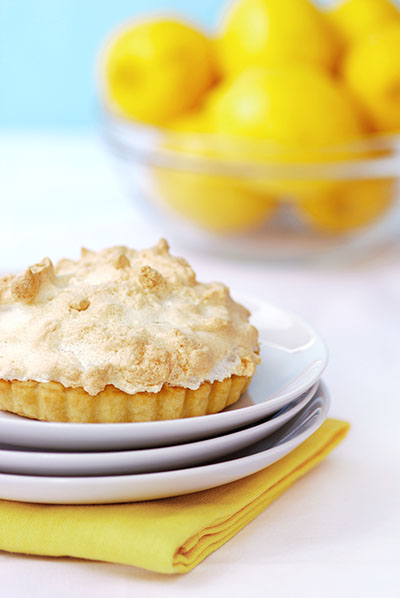
We are not permitted to deviate from the host’s recipe so I only went as far as to make sure my curd was hot before I put the meringue on it and it seemed to help. I will definitely experiment with the other tricks above next time as I saw consistent advice throughout the web. Note: I made one large lemon meringue pie and then couldn't resist making a small one with the remaining dough (using a mini tart pan). The mini version was adorable and makes a wonderful individual-sized dessert.

Thanks, Jen, for the challenge. I learned a lot and it was fun!
Lemon Meringue Pie (from Wanda's Pie in the Sky)
(Makes one 10-inch (25 cm) pie)

For the Crust:

¾ cup (180 mL) cold butter; cut into ½-inch (1.2 cm) pieces
2 cups (475 mL) all-purpose flour
¼ cup (60 mL) granulated sugar
¼ tsp (1.2 mL) salt
⅓ cup (80 mL) ice water

For the Filling:

2 cups (475 mL) water
1 cup (240 mL) granulated sugar
½ cup (120 mL) cornstarch
5 egg yolks, beaten
¼ cup (60 mL) butter
¾ cup (180 mL) fresh lemon juice
1 tbsp (15 mL) lemon zest
1 tsp (5 mL) vanilla extract

For the Meringue:

5 egg whites, room temperature
½ tsp (2.5 mL) cream of tartar
¼ tsp (1.2 mL) salt
½ tsp (2.5 mL) vanilla extract
¾ cup (180 mL) granulated sugar
(note: see link above for optional corn starch addition to help stabilize the meringue)

For the Crust:
Make sure all ingredients are as cold as possible. Using a food processor or pastry cutter and a large bowl, combine the butter, flour, sugar and salt. Process or cut in until the mixture resembles coarse meal and begins to clump together. Sprinkle with water, let rest 30 seconds and then either process very briefly or cut in with about 15 strokes of the pastry cutter, just until the dough begins to stick together and come away from the sides of the bowl. Turn onto a lightly floured work surface and press together to form a disk. Wrap in plastic and chill for at least 20 minutes.

Allow the dough to warm slightly to room temperature if it is too hard to roll. On a lightly floured board (or countertop) roll the disk to a thickness of ⅛ inch (.3 cm). Cut a circle about 2 inches (5 cm) larger than the pie plate and transfer the pastry into the plate by folding it in half or by rolling it onto the rolling pin. Turn the pastry under, leaving an edge that hangs over the plate about ½ inch (1.2 cm). Flute decoratively. Chill for 30 minutes.

Preheat oven to 350ºF (180ºC). Line the crust with foil and fill with metal pie weights or dried beans. Bake for 20 to 25 minutes. Carefully remove the foil and continue baking for 10 to 15 minutes, until golden. Cool completely before filling.

For the Filling:
Bring the water to a boil in a large, heavy saucepan. Remove from the heat and let rest 5 minutes. Whisk the sugar and cornstarch together. Add the mixture gradually to the hot water, whisking until completely incorporated.

Return to the heat and cook over medium heat, whisking constantly until the mixture comes to a boil. The mixture will be very thick. Add about 1 cup (240 mL) of the hot mixture to the beaten egg yolks, whisking until smooth. Whisking vigorously, add the warmed yolks to the pot and continue cooking, stirring constantly, until mixture comes to a boil. Remove from the heat and stir in butter until incorporated. Add the lemon juice, zest and vanilla, stirring until combined. Pour into the prepared crust. Cover with plastic wrap to prevent a skin from forming on the surface, and cool to room temperature (note: advise not cooling the filling based on what I've read about meringue. Make the meringue before the filling cools or keep the filling in a small pan and re-heat once the meringue is ready).

For the Meringue:

Preheat the oven to 375ºF (190ºC). Using an electric mixer beat the egg whites with the cream of tartar, salt and vanilla extract until soft peaks form. Add the sugar gradually, beating until it forms stiff, glossy peaks. Pile onto the cooled pie, bringing the meringue all the way over to the edge of the crust to seal it completely. Bake for 15 to 20 minutes, or until golden. Cool on a rack. Serve within 6 hours to avoid a soggy crust.

Tuesday, January 22, 2008

Grown up graham crackers

I find homemade, wholesome versions of classic packaged foods to be quite charming. For example, a homemade Hostess cupcake or homemade macaroni and cheese always delights. Along these lines, I was struck by a random craving for graham crackers last week and set off to see if there was a recipe out there. It was with complete delight that I found a version on 101coobooks from Nancy Silverton's Pastries from the La Brea Bakery (Hardcover) and a take on the same recipe from JenJen of Milk and Cookies. As Heidi so aptly describes, these homemade graham crackers taste just like the real thing – only better: they are buttery and full of honey and vanilla and have just the right texture and crisp.

I was surprised that the recipe did not contain any graham flour that I figured was the reason for its name. Apparently that was originally the case, but the modern day recipe has departed from the original version developed in 1822 in Bound Brook, New Jersey, by Presbyterian minister Reverend Sylvester Graham. The original cracker was conceived as a health food and contained graham flour and considerably less sweeteners than the cookie we know of. In fact, Reverend Graham was the founder of an entire diet known as the Graham Diet that was meant to suppress “unhealthy carnal urges”, of which “Graham Bread” (as it was then known) played a part. For more information, read here.

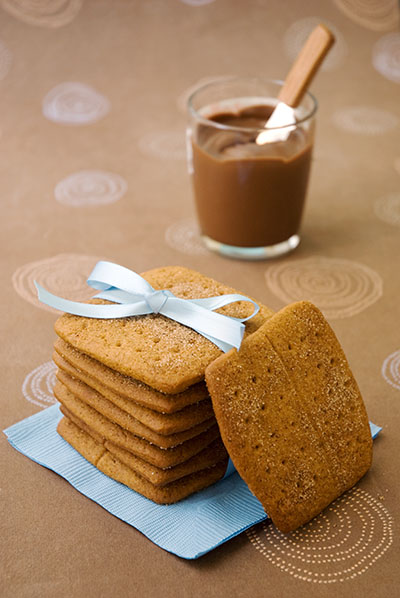
Back to the sinful variety. The recipe is very straightforward and is guaranteed to put a smile on the face of anyone with whom you share the end result. Be warned, however, it requires a bit of patience. While there’s very little active time, the dough must be chilled twice and the hand-scoring of a line down the middle and pricking of the decorative dots that are so clearly associated with a graham cracker take time. It’s definitely worth the effort, however.

I tried the recipe twice. The first time I followed the baking instructions precisely (and dipped the finished cookie in tempered semi-sweet chocolate to coat half). I rolled the dough a little too thick considering the surprising amount it rose in the oven and also found the 4 x 4.5 inch size to be a little too big. The second time, I used a 3x3 square cookie cutter and took care to roll the dough as thinly as possible. The result was a crisper, more manageable cookie. Watch the baking time – the thin ones cook slightly faster than the 25 minutes called for in the recipe.

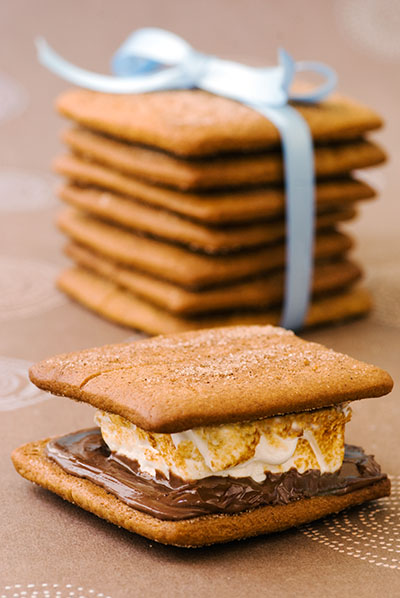
I of course had to make a few s’mores – who can eat a graham cracker without the fixins’? (although I promise, plain is just as good!)

Graham Crackers (from Nancy Silverton's Pastries from the La Brea Bakery (Villard, 2000) reprinted from 101cookbooks.
Yield: 10 large crackers (or 24 smaller crackers if you follow my method for cutting the crackers described above)

2 1/2 cups plus 2 tablespoons unbleached pastry flour or unbleached all-purpose flour
1 cup dark brown sugar, lightly packed
1 teaspoon baking soda
3/4 teaspoon kosher salt
7 tablespoons (3 1/2 ounces) unsalted butter, cut into 1-inch cubes and frozen
1/3 cup mild-flavored honey, such as clover (CC note: this is an important element: use high-quality honey)
5 tablespoons whole milk
2 tablespoons pure vanilla extract

For the topping:

3 tablespoons granulated sugar
1 teaspoon ground cinnamon

In the bowl of a food processor fitted with the steel blade or in the bowl of an electric mixer fitted with the paddle attachment, combine the flour, brown sugar, baking soda, and salt. Pulse or mix on low to incorporate. Add the butter and pulse on and off on and off, or mix on low, until the mixture is the consistency of a coarse meal.

In a small bowl, whisk together the honey, milk, and vanilla extract. Add to the flour mixture and pulse on and off a few times or mix on low until the dough barely comes together. It will be very soft and sticky.

Turn the dough out onto a lightly floured work surface and pat the dough into a rectangle about 1 inch thick. Wrap in plastic and chill until firm, about 2 hours or overnight.

To prepare the topping: In a small bowl, combine the sugar and cinnamon, and set aside.

Divide the dough in half and return one half to the refrigerator. Sift an even layer of flour onto the work surface and roll the dough into a long rectangle about 1/8 inch thick. The dough will be sticky, so flour as necessary. Trim the edges of the rectangle to 4 inches wide. Working with the shorter side of the rectangle parallel to the work surface, cut the strip every 4 1/2 inches to make 4 crackers. Gather the scraps together and set aside. Place the crackers on one or two parchment-lined baking sheets and sprinkle with the topping. Chill until firm, about 30 to 45 minutes. Repeat with the second batch of dough.

Adjust the oven rack to the upper and lower positions and preheat the oven to 350 degrees.

Gather the scraps together into a ball, chill until firm, and re-roll. Dust the surface with more flour and roll out the dough to get about two or three more crackers.

Mark a vertical line down the middle of each cracker, being careful not to cut through the dough. Using a toothpick or skewer, prick the dough to form two dotted rows about 1/2 inch for each side of the dividing line.

Bake for 25 minutes, until browned and slightly firm to the touch, rotating the sheets halfway through to ensure even baking.

Tuesday, January 15, 2008

Spicing it up: classic Bloody Mary

There are a couple of drink challenges going on this month: one for “Click,” and the other for my "Still Life With" food photography group on flickr. I’ve been thinking about drinks that would both provide a photography challenge and be fun to drink and have come up with two ideas. The first, posted here, is the classic Bloody Mary. Fellow blogger Lynne from Café Lynnylu beat me to the punch with a beautiful creole Bloody Mary. You can see hers here.

I love nothing more than a two-fisted Sunday brunch experience: a Bloody Mary in one hand and a cappuccino in the other. If I don’t wake up after that, there’s absolutely no hope. I love the bite of a good Bloody Mary and love the way it cuts through eggs or whatever other less than healthy feast you may be having on a lazy Sunday. There are countless ways to concoct a Bloody Mary according to your taste - be it smooth, thick, mild or spicy.

I did a search for Bloody Mary recipes and seemingly every chef and bar tender has a version. Most are variations on the classic ingredients: vodka, tomato juice, lemon or lime juice, Tabasco, horseradish, celery salt, and Worcestershire sauce. Others have put their own spin on it adding wasabi, basalmic vinegar, sherry, red wine, or beef bouillon (otherwise known as a “bloody bull” (as my cousin would have it)).

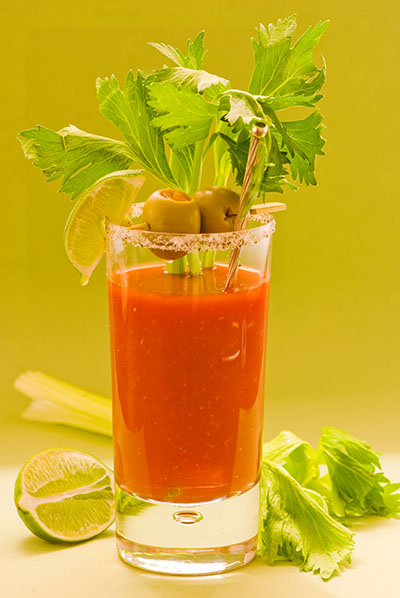
Garnish options abound. Celery and olives are classic. Other common garnishes include pickled beans or okra, radishes, cherry tomatoes or jalapeño peppers.

I, myself, like a virgin Bloody Mary (i.e. without alcohol: I have a hard enough time dealing with vodka after sundown), and I like it to be spicy and meaty, with tons of flecks of “stuff” floating around in it. Everyone has a different tolerance for heat. The best bet for preparing a pitcher for guests is to leave out the vodka and go light on the Tabasco, providing vodka, extra Tabasco, seasonings and toppings on the side so everyone can prepare and spice up her own.

If you want to veer off the classic track a little, there are my cousins to the Bloody Mary that result from replacing vodka with other alcohols or changing the mixer. For example, there’s a Bloody Maria that uses Tequila and a Ruddy Mary that uses gin in place of vodka. In terms of mixer changes, there’s a Bull Shot that replaces tomato juice entirely with beef bouillon or beef consommé, and a Bloody Caesar that replaces tomato juice with Clamato (a clam juice / tomato juice combination) that is apparently more popular in Canada than the traditional version.

All of this, of course, begs the question of why a Bloody Mary is so named. You can read up on this in detail (plus find a reference to an interesting-sounding book solely on the Bloody Mary if you are so inclined to dig further) in a Bon Appétit article Café Lynnylu found. The part of the story I take particular interest in, of course, is the part that ascribes the rise of the drink to old New York: the drink apparently first appeared at Harry's New York Bar in Paris and where it was invented by bartender Petiot. John Jacob Astor allegedly discovered the drink at Harry's and brought both the bartender and his drink to the Astor’s hotel, The St. Regis. The rest, as they say, is history. Why the name? Some ascribe it to the slaughter of protestants by of Queen Mary Tudor, “Bloody Mary,” the Catholic daughter of Henry VIII. Others say it comes from a British man who incessantly complained about his wife while sipping the tomato-juice based drink at Harry’s bar. There are countless other theories.

If you want to read more, Wikipedia has a nice summary of the history and varieties of Bloody Mary, and an entire website devoted solely to recipes. For more on the history and lore surrounding the Bloody Mary, see Bon Appétit here.

Bloody Mary (adapted from the Barefoot Contessa)

I like starting with the Barefoot Contessa’s tame version and spicing it up to my taste. Her version calls for minced celery stalks which adds a nice, thick texture to the mix. I then double most of the seasonings and add the juice of one lime, a teaspoon of freshly ground black pepper (not too course as that can be unpleasant) and my own secret juju: ¼ cup olive juice (yum!). I’m providing my own version below, but the original can be found here.

3 large stalks celery from the heart, including leaves, plus extra for serving
1 46 ounce can tomato juice (recommended: Sacramento)
5 teaspoons prepared horseradish
3 teaspoon grated yellow onion
1/4 cup olive juice
1 lemon, juiced
1 lime, juiced
1 teaspoon Worcestershire sauce
1 1/2 teaspoon celery salt
1 teaspoon freshly ground pepper
1/2 teaspoon kosher salt
16 dashes hot sauce (recommended: Tabasco), or to taste
1 3/4 cups vodka
(optional)

Cut the celery in large dice, including the leaves, and puree in the bowl of a food processor fitted with the steel blade. Process until finely minced. In a large pitcher, combine the rest of the ingredients except the vodka. With the food processor running, pour 1/4 of the tomato juice mixture into the food processor through the feed tube. Then pour the contents of the food processor into the pitcher with the remaining tomato juice mixture. Adjust seasonings to taste. Add the vodka and chill. Serve in tall glasses over ice with a stick of celery, olives or other garnish of your choice.

Thursday, January 10, 2008

Agedashi tofu and thoughts on Japanese food photography

I’m loving all things Japanese lately. I have always had a love of Asian food generally, and Japanese food in particular for the delicateness and complexity of the flavors and beauty of the presentation. We have a few special Japanese restaurants in our neighborhood that I never tire of, including one that makes the most unbelievable fresh, homemade tofu every hour. I often get a craving for the tofu which is presented in a lacquered box and is spooned into beautiful handmade bowls, into which you pour a light brown soy-based sauce and then enjoy the silky smooth tofu (almost custard-like in texture) in all its wonderful simplicity. I also love the aesthetics of modern Japanese art and design. There are quite a few on-line stores I love to check in on for both the beauty of the product design and for the merchandising / photography that has a certain wonderful sensual quality that is very hard to describe (see here and here and here).

Recently, I made a trip to a Japanese bookstore to browse food magazines and cookbooks. Not surprisingly, I found that the food photographs have many of the same wonderful qualities that I appreciate in the furnishings and design photos I look at. It’s so refreshing to see food photography that has a different (non-U.S.) perspective than what one is used to. The Japanese food photos have a certain simple elegance. They are mostly very reductive with only a few, well-chosen props (a pretty spoon, a lovely piece of pottery), and a lot of negative space. These photos are often shot on a textured fabric cloth or a wooden table and many of it is shot horizontally – an orientation I don’t often gravitate toward in my own photos. Interestingly, they have casualness about them, unlike a spread one might see in Saveur or MSL. There’s often a wrinkled tablecloth, a more casual setting or crumbs on the table. I’m sure they are all strategically placed and well considered but the overall image comes across as informal and relaxed and beautiful in an “everyday beauty” sort of way. I’ve been having fun recently experimenting with that style. I love Harumi’s (the “Martha Stewart of Japan”) magazine. Not only are the photos gorgeous but the paper is wonderful as well. Unfortunately I cannot read a word of what’s written but it’s such a pleasure to look through that I am very tempted to subscribe!

I also bought via Amazon a couple of Harumi’s English-language cookbooks. I found the overall presentation to be less wonderful than her Japanese-language magazines (geared toward the American market?) but was able to read and enjoy the recipes. One that stood out was for Agedashi tofu, a deep-fried tofu in a soy and dashi-based broth topped with grated daikon and scallions. It’s one of my favorite Japanese dishes and it looked easy enough to attempt. It turned out just as it should and was delicious! The Agedashi tofu pictures are mine, and the other two are from one of the Harumi magazines for you to see and enjoy. Would love your thoughts.

p.s. The mug in my photo is another of my father-in-law’s creations. My bowl is a recent acquisition from White Forest Pottery, appropriately made in the “wabi sabi aesthetic that honors the beauty of imperfection”.

Agedashi tofu (from Harumi's Japanese Cooking)
(serves 4)

2 (12.3 oz) boxes silken tofu
potato starch or cornstarch for dusting the tofu pieces
oil - enough to deep-fry the tofu
1 cup dashi stock or fish stock
2 tablespoons mirin
2 tablespoons soy sauce
a little superfine sugar
a little salt
grated daikon (mooli or Japanese white radish)
grated ginger to taste
shiso leaves, chopped into thin strips or a mix of fresh basil or mint leaves
myoga, minced (optional)
green onion or chives, minced

1. Drain the tofu and then wrap it in paper towels and place in a strainer for 30 minutes to remove excess moisture.

2. Cut the tofu into four pieces, dry again with paper towels, then coat with the potato starch

3. Heat the oil to a suitable temperature for deep-frying (around 340 degrees F). Carefully put the tofu pieces in to fry, and when they turn golden, remove and drain on paper towels to remove excess oil.

4. In a small pan, heat up the dashi stock, mirin, soy sauce, sugar and salt. bring to boil, ensuring that the sugar has dissolved.

5. Divide the tofu among four bowls. Pour a little of the hot sauce into each bowl and garnish with the grated daikon, a dab of grated ginger, shiso, myoga and green onion to taste.

Friday, January 04, 2008

A bit of sunshine in the winter: lemon cake

I’ve been looking back through the archives at posts from the very beginning of the blog. They are somewhat dreadful. Some don’t have photographs and others have photographs that are sorely lacking. I didn’t really write much about the dish or the context, mostly just posted the recipe.

When I first started blogging, I did it more to record and organize my recipes and learn about blogging than to really explore and share my culinary experiences. As time went on, I started to really enjoy writing about food and exchanging thoughts and reactions with other bloggers and blog readers. I then really stepped back to think about what it is that I love about food and cooking and realized it’s both the chemistry and art of combining ingredients and creating a dish, and the aesthetics of food that I love: the colors, textures and scale of the dish and the way it is presented at the table. I enjoy art and design as much as I enjoy food, and for me, both are critical to creating something that’s appetizing and memorable. This naturally gave rise to an intense interest in photography, and capturing the beauty in a dish, a table setting, and a scene.

Now that I am approaching blogging with a different angle, I’m going to periodically revisit some of my earlier posts and fill in some of the gaps. The first is one of my favorite go-to cakes, The Barfoot Contessa’s lemon cake. It seems appropriate to revisit this sunny little cake in the midst of winter! This cake is characteristically over-the-top: it’s soaked in a lemon syrup and has a sweet lemon icing on the top. What’s great about it is that given all of the moisture in the cake, it keeps very nicely and is also works pre-sliced and wrapped if you need something that fits that bill. I saw this prepared on one of The Barefoot Contessa’s shows about picnic food, and she prepared and served individually-sized portions of all of her picnic dishes (including the cake) in Chinese takeout cartons – it was a very cute and practical idea.

Lemon cake (From Barefoot Contessa Parties, courtesy of the Food Network)
Yield: 2 (8-inch) loaves

For the cake and lemon syrup
1/2 pound (2 sticks) unsalted butter, at room temperature
2 1/2 cups granulated sugar, divided
4 extra-large eggs, at room temperature
1/3 cup grated lemon zest (6 to 8 large lemons)
3 cups flour
1/2 teaspoon baking powder
1/2 teaspoon baking soda
1 teaspoon kosher salt
3/4 cup freshly squeezed lemon juice, divided
3/4 cup buttermilk, at room temperature
1 teaspoon pure vanilla extract

For the glaze:
2 cups confectioners' sugar, sifted
3 1/2 tablespoons freshly squeezed lemon juice
Preheat the oven to 350 degrees F. Grease and flour 2 (8 1/2 by 4 1/4 by 2 1/2-inch) loaf pans. You may also line the bottom with parchment paper, if desired.
Cream the butter and 2 cups granulated sugar in the bowl of an electric mixer fitted with the paddle attachment, until light and fluffy, about 5 minutes. With the mixer on medium speed, add the eggs, 1 at a time, and the lemon zest.

Sift together the flour, baking powder, baking soda, and salt in a bowl. In another bowl, combine 1/4 cup lemon juice, the buttermilk, and vanilla. Add the flour and buttermilk mixtures alternately to the batter, beginning and ending with the flour. Divide the batter evenly between the pans, smooth the tops, and bake for 45 minutes to 1 hour, until a cake tester comes out clean.

Combine 1/2 cup granulated sugar with 1/2 cup lemon juice in a small saucepan and cook over low heat until the sugar dissolves. When the cakes are done, allow to cool for 10 minutes. Remove the cakes from the pans and set them on a rack set over a tray or sheet pan; spoon the lemon syrup over them. Allow the cakes to cool completely.

For the glaze, combine the confectioners' sugar and the lemon juice in a bowl, mixing with a wire whisk until smooth. Pour over the tops of the cakes and allow the glaze to drizzle down the sides.

Tuesday, January 01, 2008

Happy new year and a (cuatro) leches cake

Happy new year everyone! I wanted to thank everyone for your readership this past year. I am so grateful for all of your support, comments, and interest.

I’ve had my little blog for about a year and a half now. I’ve learned so much and have had so much fun cooking, writing, and discovering. It’s been great meeting people through the blog and discovering new blogs to read. There are so many interesting and talented bloggers out there, it’s just amazing. Last year, I tried to up my food photography game. I joined flickr and have been participating in a number of food photography groups – a great experience. I learned how to use Photoshop (really there’s no end to the learning but I’ve at least gotten to a point where I can make use of a number of the truly amazing features it offers). I joined the Daring Bakers group, which has led to some wonderful new baking challenges. I started to participate in some of the many food and photography events in the blogosphere. It’s been a great year and I’m looking forward to more of the same next year.

Now, on to food. R and I had a lovely and low-key new years celebration with two of our friends last night. They cooked Nigerian food and we brought caviar and dessert. I decided to try something new rather than fall back on the tried and true and chose a recipe that intrigued me from this month’s Metropolitan Home (go figure). It’s a Colombian spin on a classic Mexican tres leches cake with one additional milk, a milky caramel-y dulce de leche sauce (making it a 4 leches cake!). I love tres leches cake and have been meaning to find a good recipe to try, so I decide this was the time. To add to the interest, the recipe for the dulce de leche sauce came with a warning that if not cooked properly, it might explode. After that type of a warning, I could not resist trying!

The cake was wonderful and very pretty. It was very dense and moist and the meringue frosting was silky and not stiff, as I would have expected. While delicious, we all thought the dulce de leche sauce was unnecessary – it made the cake sweeter than it needed to – the cake can easily stand on its own. I do, however, think the sauce would be lovely in another context – maybe on a dense chocolate cake or something where a little extra sweetness, moisture or a contrasting flavor would be nice.

Cuatro leches cake (from Chef Dunia Borga from La Duni Latin Café in Dallas as printed in Metropolitan Home, December 2007)
Serves 10

Vanilla cake:
3 cups all-purpose flour
1 ½ tsp baking powder
¼ tsp salt
1 cup (2 sticks) unsalted butter, at room temperature, plus extra for buttering pan
2 cups granulated sugar
4 large eggs
1 tsp pure vanilla extract
1 cup whole milk

Arequipe (dulce de leche sauce)
1 (14 oz) unopened can sweetened condensed milk
½ cup whole milk, warmed

Tres leches sauce:
¾ cup evaporated milk
¾ cup sweetened condensed milk
¾ cup whipping cream

Meringue:
2 cups granulated sugar
½ cup water
1 cup egg whites (from 7 large eggs)
1 tbsp lemon juice
½ tsp pure vanilla extract
Confectioners’ sugar, for decorating

1. To make cake, preheat oven to 350˚F and arrange an oven rack in the lower third of the oven. Butter a 9-inch cake pan, line with a round of parchment paper, and butter the paper. Sift the flour with the baking powder and salt into a bowl. Cream the butter with an electric mixer on medium-high speed until very fluffy. Add the sugar, ½ cup at a time, beating after each addition, until blended. On low speed, add the eggs one at a time, beating after each addition. Beat in the vanilla. Finally, beat in the dry ingredients, alternating one with the milk: first, about one third of the dry ingredients, then ½ cup of the milk, another third of the dry ingredients, the remaining ½ cup milk, and finally the remaining dry ingredients. Beat until fully mixed, 30 seconds to 1 minute. Do not over beat.

Pour patter into the prepared cake pan and bake until the center of the cake springs back when touched an a tester inserted comes out clean, 60 to 70 minutes. Let the cake cool in the pan on a rack for 10 minutes and then turn it out on the rack to cool completely.

2. To make the arequipe sauce, place the unopened can of sweetened condensed milk in a perforated insert such as a pasta pot) inside a large pot and cover with water. Bring to a simmer over medium high heat, and simmer for 2 hours, turning the can twice during cooking, once after 45 minutes, then again at 1 ½ hours. (Make sure the can is always covered by water, or it may explode.) Remove can from water and let cool before opening. Be careful when opening it, as the contents will squirt out; pour into a bowl, whisk in the milk, cover and refrigerated.

3. To make the meringue, combine the sugar and water in a small saucepan. Bring to a simmer over medium heat and cook, undisturbed, until the syrup reaches 240˚F (soft ball stage) on a candy thermometer. When the thermometer registers 200˚F, begin beating the egg whites on medium speed in an electric mixer fitted with the wire whip until soft peaks form.

4. To assemble the cake, turn the cake out onto a cardboard round and remove the parchment. With a long serrated knife, cut the cake into 3 even layers. Remove the top 2 layers. Use a fork, to pierce the bottom layer all over; brush with about ¾ cup of the tres leches sauce, giving the sauce time to soak into the cake. Place the second layer on top, pierce with the fork, and brush with another ¾ cup of the sauce. Spread top and sides of the cake with about 1 inch of meringue, finishing the top with peaks. Use a blow torch (or run under a broiler, if possible) to caramelize the meringue. To serve, cut the cake into wedges, drizzle with the arequipe sauce, and sift confectioners’ sugar over it.